Wood Pallet Flooring Ideas: Transform Your Space with Reclaimed Charm
If you’re looking for a budget‑friendly way to give a room a rustic, industrial, or even contemporary feel, wood pallet flooring should be at the top of your list. Pallets are abundant, inexpensive, and—when treated right—extremely durable. This guide walks you through the most popular pallet‑flooring styles, the tools you’ll need, step‑by‑step installation tips, and maintenance tricks so you can keep your floor looking fresh for years.
1. Why Choose Pallet Flooring?
| Benefit | Explanation |
|---|---|
| Cost‑Effective | A single pallet can cost as little as $5–$15. Even after sanding and finishing, the total cost per square foot is often half the price of new hardwood. |
| Eco‑Friendly | You’re repurposing waste wood that would otherwise end up in a landfill, reducing your carbon footprint. |
| Customizable | Pallets come in a variety of wood species, dimensions, and surface textures, allowing you to create a truly unique floor. |
| DIY‑Friendly | Most projects can be completed with basic hand tools, making it a perfect weekend‑warrior project. |
| Industrial Appeal | The raw, weathered look adds character to lofts, garages, workshops, and even cozy living rooms. |
2. Picking the Right Pallet
Before you start cutting, sanding, or staining, you need to select pallets that will hold up under foot traffic.
| Factor | What to Look For |
|---|---|
| Condition | Choose pallets that are free of cracks, splinters, or rot. Lightly sand a test board to feel the wood grain—if it’s smooth and firm, the pallet is good to go. |
| Treatment Markings | Look for “HT” (heat‑treated) stamps. Avoid pallets marked “MB” (methyl bromide) or “DP” (dual purpose) as these have been chemically treated and may be hazardous. |
| Wood Species | Oak, pine, and poplar are most common. Oak is hardest and wear‑resistant; pine is lighter and easier to sand; poplar gives a bright, uniform tone. |
| Size & Thickness | Standard pallets measure 48” × 40” with boards about ½‑in to 1‑in thick. Thicker boards will feel more solid underfoot but add weight to the subfloor. |
| Availability | Many local warehouses, grocery stores, and construction sites discard pallets for free. Call ahead and ask permission before loading them onto a truck. |
Pro tip: If you’re planning a floor that will see heavy traffic (e.g., a kitchen or workshop), aim for pallets with boards at least ¾‑in thick and consider reinforcing with a plywood underlayment.
3. Design Ideas to Inspire Your Project
Below are five popular pallet‑flooring concepts, each with a brief description of the look, recommended finish, and ideal room type.
| Idea | Style Description | Recommended Finish | Best For |
|---|---|---|---|
| Classic Staggered Layout | Boards run parallel, with each new row offset by half a board—just like traditional hardwood flooring. | Satin polyurethane for durability + a light stain to bring out grain. | Living rooms, bedrooms, loft spaces. |
| Chevron / Herringbone | Boards cut into rectangles and laid at 45° angles to form a V‑shaped pattern. | Matte oil‑based finish for a natural look. | Entryways, dining rooms, modern lofts. |
| Mixed‑Species Mosaic | Combine pallets of different wood species for a patchwork effect. | Clear sealer to preserve color contrast. | Creative studios, kids’ playrooms, art galleries. |
| Reclaimed Industrial | Use raw, untreated pallets, leave edges rough, and apply a dark, matte wax. | Dark wax or oil (e.g., Danish oil) for an aged, patina finish. | Workshops, garages, basements. |
| Floating Deck‑Style Panel | Assemble pallets into large square panels (e.g., 4‑ft × 4‑ft) and “float” them over the subfloor without glue or nails. | High‑gloss polyurethane for a sleek, contemporary feel. | Modern kitchens, office spaces, commercial cafés. |
4. Tools & Materials Checklist
| Tool / Material | Purpose |
|---|---|
| Safety gear (gloves, goggles, dust mask) | Protect yourself from splinters and dust. |
| Circular saw or table saw | Cut pallets to desired length/width. |
| Orbital sander or belt sander | Remove roughness, prepare surface for finish. |
| Wood filler | Fill any small cracks or nail holes before sanding. |
| Sandpaper (80‑120 grit, then 220 grit) | Progressive smoothing of the wood. |
| Stain (optional) | Add color while allowing grain to show. |
| Polyurethane, oil, or wax finish | Seal and protect the floor. |
| Measuring tape & chalk line | Ensure straight, even rows. |
| Rubber mallet & wood blocks | Tap boards flat without damaging edges. |
| Construction adhesive (optional) | Secure boards to subfloor if you prefer a glued method. |
| Plywood underlayment | Adds stability for uneven subfloors. |
| Spacer shims | Maintain expansion gaps at walls. |
5. Step‑by‑Step Installation (Staggered Layout)
Below is a concise, actionable workflow you can follow even if you’ve never laid a floor before.
Note: If you’re working on a carpeted area, remove the carpet and padding first. Ensure the subfloor is clean, dry, and level.
5.1. Prepare the Pallets
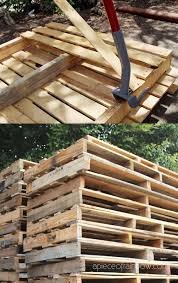
- Disassemble – Use a crowbar and hammer to pry boards apart. Remove any nails or metal brackets.
- Trim to Size – Cut each board to a uniform width (commonly 6‑in or 8‑in) using a circular saw.
- Sand Rough Edges – Lightly sand the ends to avoid splinters.
5.2. Treat & Finish the Boards
| Step | Action |
|---|---|
| A. Clean | Wipe each board with a damp cloth to remove dust. |
| B. Fill Gaps | Apply wood filler to any cracks; let dry completely (usually 30‑45 min). |
| C. Sand | Start with 80‑grit to level the surface, then finish with 220‑grit for smoothness. |
| D. Stain (optional) | Apply stain with a brush or rag, following grain direction; let dry 24 hrs. |
| E. Seal | Apply two coats of satin polyurethane (or oil/wax) with a brush or roller; sand lightly (220 grit) between coats. |
5.3. Lay the Underlayment
- Lay a ½‑in plywood sheet over the entire subfloor, fastening it with 1‑½‑in screws every 8‑in. This isolates the pallet floor from moisture and unevenness.
5.4. Install the Boards
- Mark the Layout – Snap a chalk line along one wall to guide the first row.
- Place Spacers – Insert ¼‑in shims between the wall and the first board to allow for expansion.
- Fit Boards – Lay boards end‑to‑end, staggering each row by half a board. Tap gently with a rubber mallet and a wood block to ensure a tight fit.
- Secure – For a floating floor, simply press boards together; for a glued floor, apply construction adhesive on the underlayment before placing each board.
- Trim Excess – Use a circular saw to cut boards at the opposite wall, leaving a ¼‑in gap for expansion.
5.5. Finishing Touches
- Remove spacers and install baseboards or shoe molding to cover expansion gaps.
- Sweep the floor, then give it a final light coat of wax or oil for added sheen.
6. Maintenance & Longevity
| Task | Frequency | How‑to |
|---|---|---|
| Sweeping / Vacuuming | Daily / Weekly | Use a soft‑bristle brush attachment—avoid harsh beater bars that could loosen boards. |
| Mopping | Monthly (or as needed) | Dampen a mop with a mild wood‑cleaner solution; never soak the floor. |
| Spot‑Cleaning Stains | As they appear | Wipe with a cloth dampened in a 1:10 vinegar‑water mix; dry immediately. |
| Re‑Coating | Every 2‑3 years (high traffic) | Lightly sand the surface, clean, then apply a fresh coat of polyurethane or oil. |
| Inspecting for Loose Boards | Quarterly | Walk the floor, listen for creaks; tighten with a mallet and wood block or add a discreet screw if needed. |
7. Cost Breakdown (Sample 200‑sq‑ft Room)
| Item | Quantity | Unit Cost | Total |
|---|---|---|---|
| Pallet boards (½‑in thick) | 120 pcs (≈200 sq ft) | $8 per pallet (≈20 boards) | $48 |
| Plywood underlayment (½‑in) | 4 sheets (4 × 8) | $30 per sheet | $120 |
| Sandpaper (various grits) | 2 packs | $12 per pack | $24 |
| Stain (optional) | 1 qt | $25 | $25 |
| Polyurethane (satin, 1‑gal) | 2 gal | $35 per gal | $70 |
| Nails / Screws | 1 lb | $5 | $5 |
| Safety gear (gloves, mask) | 1 set | $15 | $15 |
| Grand Total | $307 |
Average cost per square foot: ≈ $1.54 – far less than standard engineered hardwood ($4‑$7 per ft²).
8. Frequently Asked Questions
Q1: Is pallet wood safe for indoor flooring?
A: Yes, as long as you select pallets marked “HT” (heat‑treated) rather than chemically treated ones. Always sand and finish the wood to seal any residual contaminants.
Q2: Do I need to treat the pallets for pests?
A: After sanding and sealing, most insects are deterred. However, storing the pallets in a dry, well‑ventilated area before installation helps prevent mold or termite issues.
Q3: Can I install pallet flooring over concrete?
A: Absolutely. Lay a moisture‑barrier (e.g., 6‑mil polyethylene sheeting) over the concrete, then add a plywood underlayment before the pallet boards.
Q4: Will the floor expand or contract with humidity?
A: Wood does move with moisture changes. That’s why you need expansion gaps (¼‑in) at walls and a floating installation method if you prefer not to glue the boards.
Q5: How do I repair a damaged board?
A: Remove the board by gently prying with a crowbar. Replace it with a matching piece, sand, and re‑finish. If you used a floating system, you can slide the new board into place without dismantling the entire floor.
Q6: Can I paint pallet flooring instead of staining?
A: Yes, but painting hides the natural grain, which is often the main appeal of pallet wood. If you choose paint, use a high‑quality, low‑VOC interior paint and apply a protective clear coat afterward.
Q7: Is a professional needed for large projects?
A: For most DIY‑friendly spaces (up to 400 sq ft) you can complete the job yourself. For larger commercial areas or where you need a perfectly level subfloor, hiring a flooring specialist may save time and ensure a flawless finish.
9. Final Thoughts
Wood pallet flooring is more than a cost‑saving hack—it’s a chance to give your space a story, character, and a sustainable edge. By selecting the right pallets, preparing them carefully, and following a systematic installation process, you’ll end up with a floor that feels warm underfoot and looks great for years to come.
Ready to get started? Gather those pallets, roll up your sleeves, and watch your room transform from ordinary to extraordinary—one reclaimed board at a time. Happy building!